Przelewy24 is a payment gateway supporting BLIK, fast transfers, cards and Google Pay. To configure it you need an active Przelewy24 account and four values from their panel.
Required data from the P24 panel
Sign in to the Przelewy24 panel and go to My account → My data → Settings → API data and configuration.
| Field in erphome.pl | What it is |
|---|---|
| Merchant ID | The seller ID number — you'll also find it in the "Important information" email sent after registration; it's also your P24 panel login |
| POS ID | The point-of-sale number — with a single shop usually the same as the Merchant ID |
| API Key | The API key from the API data and configuration section — used to verify transactions and webhooks |
| CRC | The transaction-signing key — in the same section |
Before using the API key, you must enter the static IP address of the erphome.pl server in the "IP address" field in My account → My data → Settings → API data and configuration, then click "Save" at the bottom of the page.
Configuration in erphome.pl
Go to Settings → Payments in the owner panel and choose Przelewy24 as the gateway.
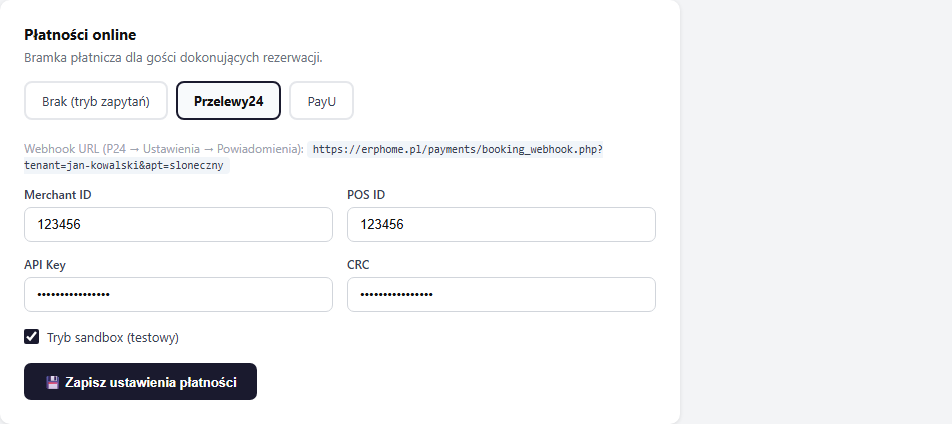
Fill in the Merchant ID, POS ID, API Key and CRC fields, then click "💾 Save payment settings".
Data verification on save
Before saving, erphome.pl connects to the Przelewy24 API and checks the provided credentials. If they're wrong, you'll see the message "Przelewy24: … Not saved — correct the data and try again." — the settings won't be saved until the data is corrected. This way a typo in a key won't silently block guest payments.
Verification uses the environment matching the "Sandbox (test) mode" checkbox — with sandbox checked enter data from the sandbox panel, with it unchecked enter production data.
Sandbox (test) mode
Sandbox is the P24 test environment — transactions are simulated, no money is charged.
How to set up sandbox:
- Sign in to your account at panel.przelewy24.pl
- Go to the "My Data" tab
- Choose the "Sandbox account" option to create it
- The sandbox panel login details will arrive in a separate email
After receiving the email, sign in to the sandbox panel and get the data from it (Merchant ID, POS ID, API Key, CRC) — they're different from production.
In erphome.pl, enter the data from the sandbox panel and tick the "Sandbox (test) mode" checkbox.
Sandbox has separate IDs, CRC and keys than production. Don't mix data between environments.
Switching from sandbox to production
When testing is done:
- In erphome.pl, uncheck the "Sandbox (test) mode" checkbox
- Change the data to production data (from panel.przelewy24.pl)
- Update the webhook URL in the production P24 panel
Webhook — configuration in the P24 panel
A webhook is the address that P24 calls after each completed payment. Without it, bookings won't be confirmed automatically.
Where to set it:
- Sign in to the appropriate panel (production or sandbox)
- Go to My account → Points of sale
- Click Edit next to your shop
- In the Notifications section, set the notification (IPN) URL:
https://erphome.pl/payments/booking_webhook.php?tenant=YOUR_SLUG&apt=APARTMENT_SLUGThe exact URL is shown in the erphome.pl panel under Settings → Payments after selecting Przelewy24.
- In the Notification method field, choose
POST - Save the changes
If you have several apartments, each needs a separate notification entry — or configure separate points of sale (POS) for each apartment.
Verifying the configuration
After saving the settings, make a test booking on your page (in sandbox mode you can use any test card).
If the booking status changes to Confirmed — the configuration works.
If the booking stays with the Awaiting payment status — the webhook isn't configured. Check the URL in the P24 panel and make sure the server's IP address is entered in the API data and configuration section.
Related articles: How online payments work · PayU configuration · How the booking process works · Payments in a booking